I hope you are satisfied with the current location of your WordPress website on the internet. However, if you are unhappy with your hosting or domain provider, you will need to find a way to move your WordPress site to a different hosting provider without causing any issues. Migrate WordPress site to new host Tutorial .
There are two primary reasons why you’ll want to migrate your WordPress site from one host or domain to another. First, you may have purchased a more trusted domain or you may want to rebrand your site with a new domain name or URL.
Or maybe your current hosting provider isn’t up to the task, or maybe you’ve saved up some extra cash for an upgrade. Regardless of why you decided to learn how to migrate your WordPress site, it will eventually help your business build a strong online presence for years to come.
As a site admin, you may be feeling a bit overwhelmed by all this. But don’t worry, we’ve got you covered. In this guide, we’ll show you how a site admin who isn’t a developer can migrate a WordPress site to another host or domain.
👉 How to Manage Unmanaged WordPress Hosting?
How to Migrate a WordPress Site
Are you ready to learn WordPress migration? The first thing to know is that WordPress migration depends on whether you’re changing your domain name or your entire web host.
Whether you’re migrating your site to a new hosting provider or simply changing your domain name, a WordPress migration plugin can help. Let’s take a look at how you would use Duplicator, one of the most popular free WordPress migration plugins, to migrate your domain. Duplicator scores big because it’s free, it does most of the conversion work for you, it saves time, and it minimizes the risk of an error.
Choose New WordPress Host Before Migrating
If you're looking for a way to migrate your site, there's a good chance you're thinking about leaving your current hosting provider and looking for a new one. You'll want to remember any issues you've had as you search for a new WordPress hosting provider.
If your site has suffered a data breach, for instance, you'll want to find a new hosting provider that provides high-quality security.
It's also important to know the different types of hosting you can choose from. Here are some things to keep in mind:
◾Shared: A single server hosts multiple websites that all use the same resources. This is usually the most cost-effective option.
◾VPS: A VPS is a virtual partition within a shared server. This allows your site to have dedicated resources available for it.
◾Dedicated: This type of plan gives you a physical server that only houses and supports your website.
◾Managed: You can manage any type of hosting plan, as long as the hosting provider takes care of the technical side of things like backups and updates.
To pick the right solution for your site, you'll need to decide what your top priorities are. Security, data storage, performance, and customer support are some of the most important things to consider. For instance, if you run a large eCommerce business, security might be higher on your priority list than other factors.
Backup WordPress Files
The first step is to create a copy of all files on your website. You'll need an FTP tool if you don't already have one. FileZilla is a great (and free) choice.
Once you've connected to your site's server through FTP, you'll need to go to the WordPress root folder. This folder contains all of your site's files. It can be called public_html, www, or named after your site.
Right-click on your WordPress root folder and select the Download option:
This will download your whole root directory to your machine. It may take a few minutes, but once it’s finished, you should be ready to proceed.
Step 1. Backup Up Your Database
Now that you've got a copy of your site's files, it's time to back up your database. Your database contains all the data about your site's content, users and much more.
To back up your database, you'll need to access it. Most web hosts allow you to do this via your control panel. If you use cPanel, you'll find the Databases section. In this section, you'll see the "phpMyAdmin" option.
Once you are in, select your database from the drop-down list on your left, and use the top menu to go to Export tab. Under Export Method, select the Quick option, and click Go to download a.sql file of your site's database.
The next step is to set up a new database on your new hosting provider. Then, you will need to import the database file from your old hosting provider, which will overwrite the content of the new database.
If you're moving to a WordPress hosting provider that uses cPanel, you'll need to do the following:
🔹In cPanel, go to the Databases tab and select MySQL Databases.
🔹Next, create a new database.
🔹Add a user to the new database from the same tab (keep the user names in mind for later).
🔹Open the new database using the same way you did in the previous step: using phpMyAdmin.
🔹Open the Import tab inside the new database.
🔹Upload the.sql file that you generated earlier.
So you’ve moved your old database to your new web host, but you still need to upload the rest of the files from your old site.
If you’ve selected a host that doesn’t use cPanel, then you will need to think about a different set of migration instructions. For instance, if you are migrating to one of the WP Engine hosting plans you can use our easy-to-use migration checklist tool:
You can find this tool in your User Portal and can use it to help you migrate to a production environment
Upload your Backup files to New Host
Your new FTP server. Go to the root folder of your FTP server. Right-click on any folder within that folder. Select the Upload option.
Find the folder you downloaded in the first step. Open the folder. Select all files and directories in the folder. The upload process may take a while because we are dealing with hundreds of files. But if you are patient, you will soon find that you are almost at the end.
Edit Your wp-config.php
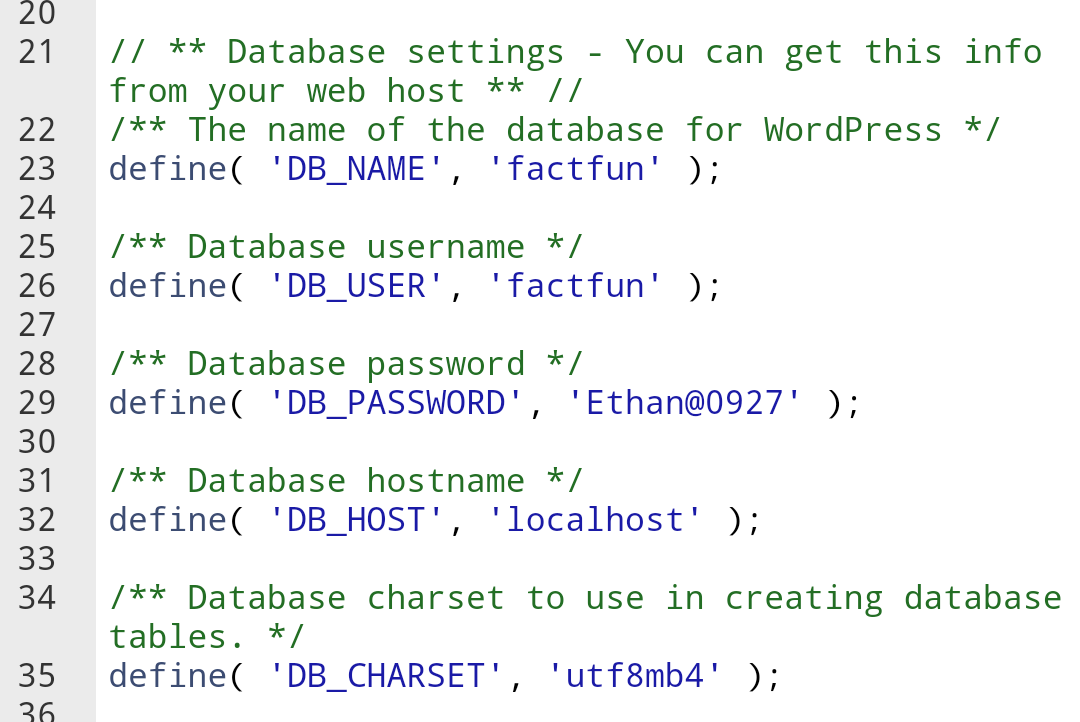
Once you have all your files up on your new server, you will need to go back to your WordPress root folder once more. If you attempt to visit your site now, it will not work because you will need to update WordPress' wp-config file to point to your new database. To do this, go to your new root folder and locate the file. Right-click on it and select View/Edit. This will open the file in your local text editor. You can then make changes to the following three lines:
define('DB_NAME, 'db_name');define('DB_USER, 'db_user');define('DB_PASSWORD, 'db_pass');At this point, all three rows will contain values pointing to the old database. Replace these values with your new database credentials that you created in Step 3 below.
Save and close the file. Your WordPress site will now look as follows:
Configure and Change your DNS Records
Finally, make sure your DNS (Domain Name Server) is pointing to the right host. For instance, if you're migrating to one of the hosting plans, you'll need to point the DNS to your new hosting provider.
You'll need two things to do this:
✔️Get information from your new host
✔️Get access to the registry where you bought your domain name
To get the details you need, go back to your Cloudflare DNS (DNS) Portal and click on Domains:
You will find the DNS Details section at the bottom of your Domains screen. Here, you will find both your CNAME Record as well as an A Name for your website. This is the information that you will need to input into your DNS configuration account. The process for entering this information will vary depending on where you bought your domain. We have compiled a list of some of the most popular registrars along with step-by-step instructions for each of them.
Migrate Your WordPress Site Using Plugin
Moving a WordPress site isn’t an easy task, and it’s normal to feel a little nervous about it. You’ve put in a lot of time and effort to build your site, and you’d hate to lose any of that work.
Fortunately, there are some great migration plugins out there that can help you out.
WordPress plugins often give you an insurance policy. Many of them can create full site backups for you. They can also provide recovery services.
If you’re only moving a small portion of your site, you can customize the migration process to fit your needs.
WP Migrate
With WP Migrate Lite, you can export all the files needed to rebuild your site in a different environment. The easy-to-use interface lets you customize your export to include exactly what you want. Just a few clicks later, you'll have a downloadable zip file of your entire site ready to move. Import the zip file to Local, and you'll have a full copy of your website ready to go in minutes.
The plugin can also find and replace content in any location in your WordPress database, and it supports serialized data, so you can migrate your database without worrying about corrupting data.
In addition, WP Migrate Pro provides even more features, including the ability to move and move files – including media, themes, plugins – between two installations, multi-site support, and WP-CLI integration.
WPvivid Backup plugin
In addition to being a great site migration plugin,
WPvivid Backup also serves as a backup for your WordPress site. You can migrate your site automatically or manually by uploading a backup to your destination site and restoring it. The best part about this plugin is that it is completely free and there are no limitations on the size of your website that you can migrate.
Migrate Your WordPress Using All-in-One Migration Plugin
WP Migration is available from the WordPress Repository. This means that you can install and activate this plugin directly from WordPress itself.
Go to Plugin > Add Plugin > Search for ‘all-in-one WP migration’.
When it appears on your page, click on Install.
Once it’s done, click on Activate.
The plugin will now be installed.
You can now use this plugin from your WordPress Main Menu.
Conclusion
Today in our post, you have learnt about how to migrate WordPress. In this post, we have also provided information about how to migrate to new web host using WordPress plugin.
We hope that you enjoyed today's article. Please let us know in the comment section if you have any queries or suggestions regarding this topic. Migrate WordPress site to new host Tutorial .


