If you're new to WordPress, then this post is for you. If you've already installed the world's leading CMS via your hosting company's auto-installer, or if you're using the well-known WordPress 5 Minute Installer, then you're probably looking forward to getting started.
But like everything else in life, a bit of planning and preparation goes a long way. Taking some time to work on the items listed below will help you get your site set-up and running smoothly now and for years to come.
In this post, we’ll be going through a laundry list of things to do. These are all things you’ll want to do right away. Most of the time, once you’re done with them, you’ll never have to think about them again.
I’ve broken this list down by importance. Some things are mission-critical, while others are more of a cosmetic nature. If you plan on setting up more WordPress sites in the future, make a list in Google Docs so you don’t miss out on anything important.
5 Best Hosting Provider - Click here and Start Blogging
Important Things You Should Do Immediately After Installing WordPress
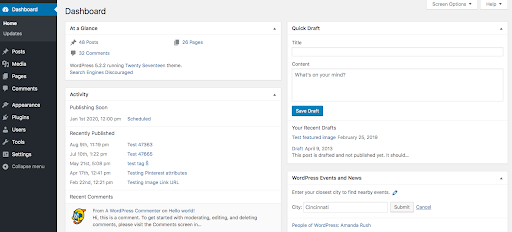
The WordPress dashboard is essentially your website's dashboard. You can create posts there, manage comments there, publish your articles there, and more.
The easiest way to access the WordPress dashboard is to add “/WP-admin” to the end of the URL of your website. This will take you to the WordPress login page where you can provide your credentials to log in to the dashboard.
Below is a brief description of what you can find in the menu:
👉 Posts: You can write/publish your own blog posts.
👉 Media: You can upload/manage the media files you publish to your blog.
👉 Pages: Just like posts, you can publish static pages on your website. This means the contact page, the about page, and any other pages that don't change frequently.
👉 Comments: You can manage and post comments to your blog posts.
👉 Appearance: Another important option on the dashboard is appearance. You can install themes on your site and customize them to your liking.
👉 WordPress plugins are the main selling point of WordPress. There are thousands of plugins available. You can use them to optimize your blog posts for search engines, compress image files, hide affiliate links, and many more.
👉 Settings: This is where you can control your site and make it searchable. You can set permalinks, write settings, etc. We will discuss this later in the article.
Update your website's title, tagline, and timezone
The first thing you’ll need to do is change the title and tagline of your site.
The title is the name of your site. It’s important because it’s the first thing your visitors will see when they search your site on Google, on your reader’s browser tab, or when they share your homepage link on social media.
The tagline is a short, catchy phrase that tells your visitors what your site is all about. For example, the title of this site is "BigBloggerTips" while the tagline is "WordPress Tips Tutorial".
Here's how to edit these:
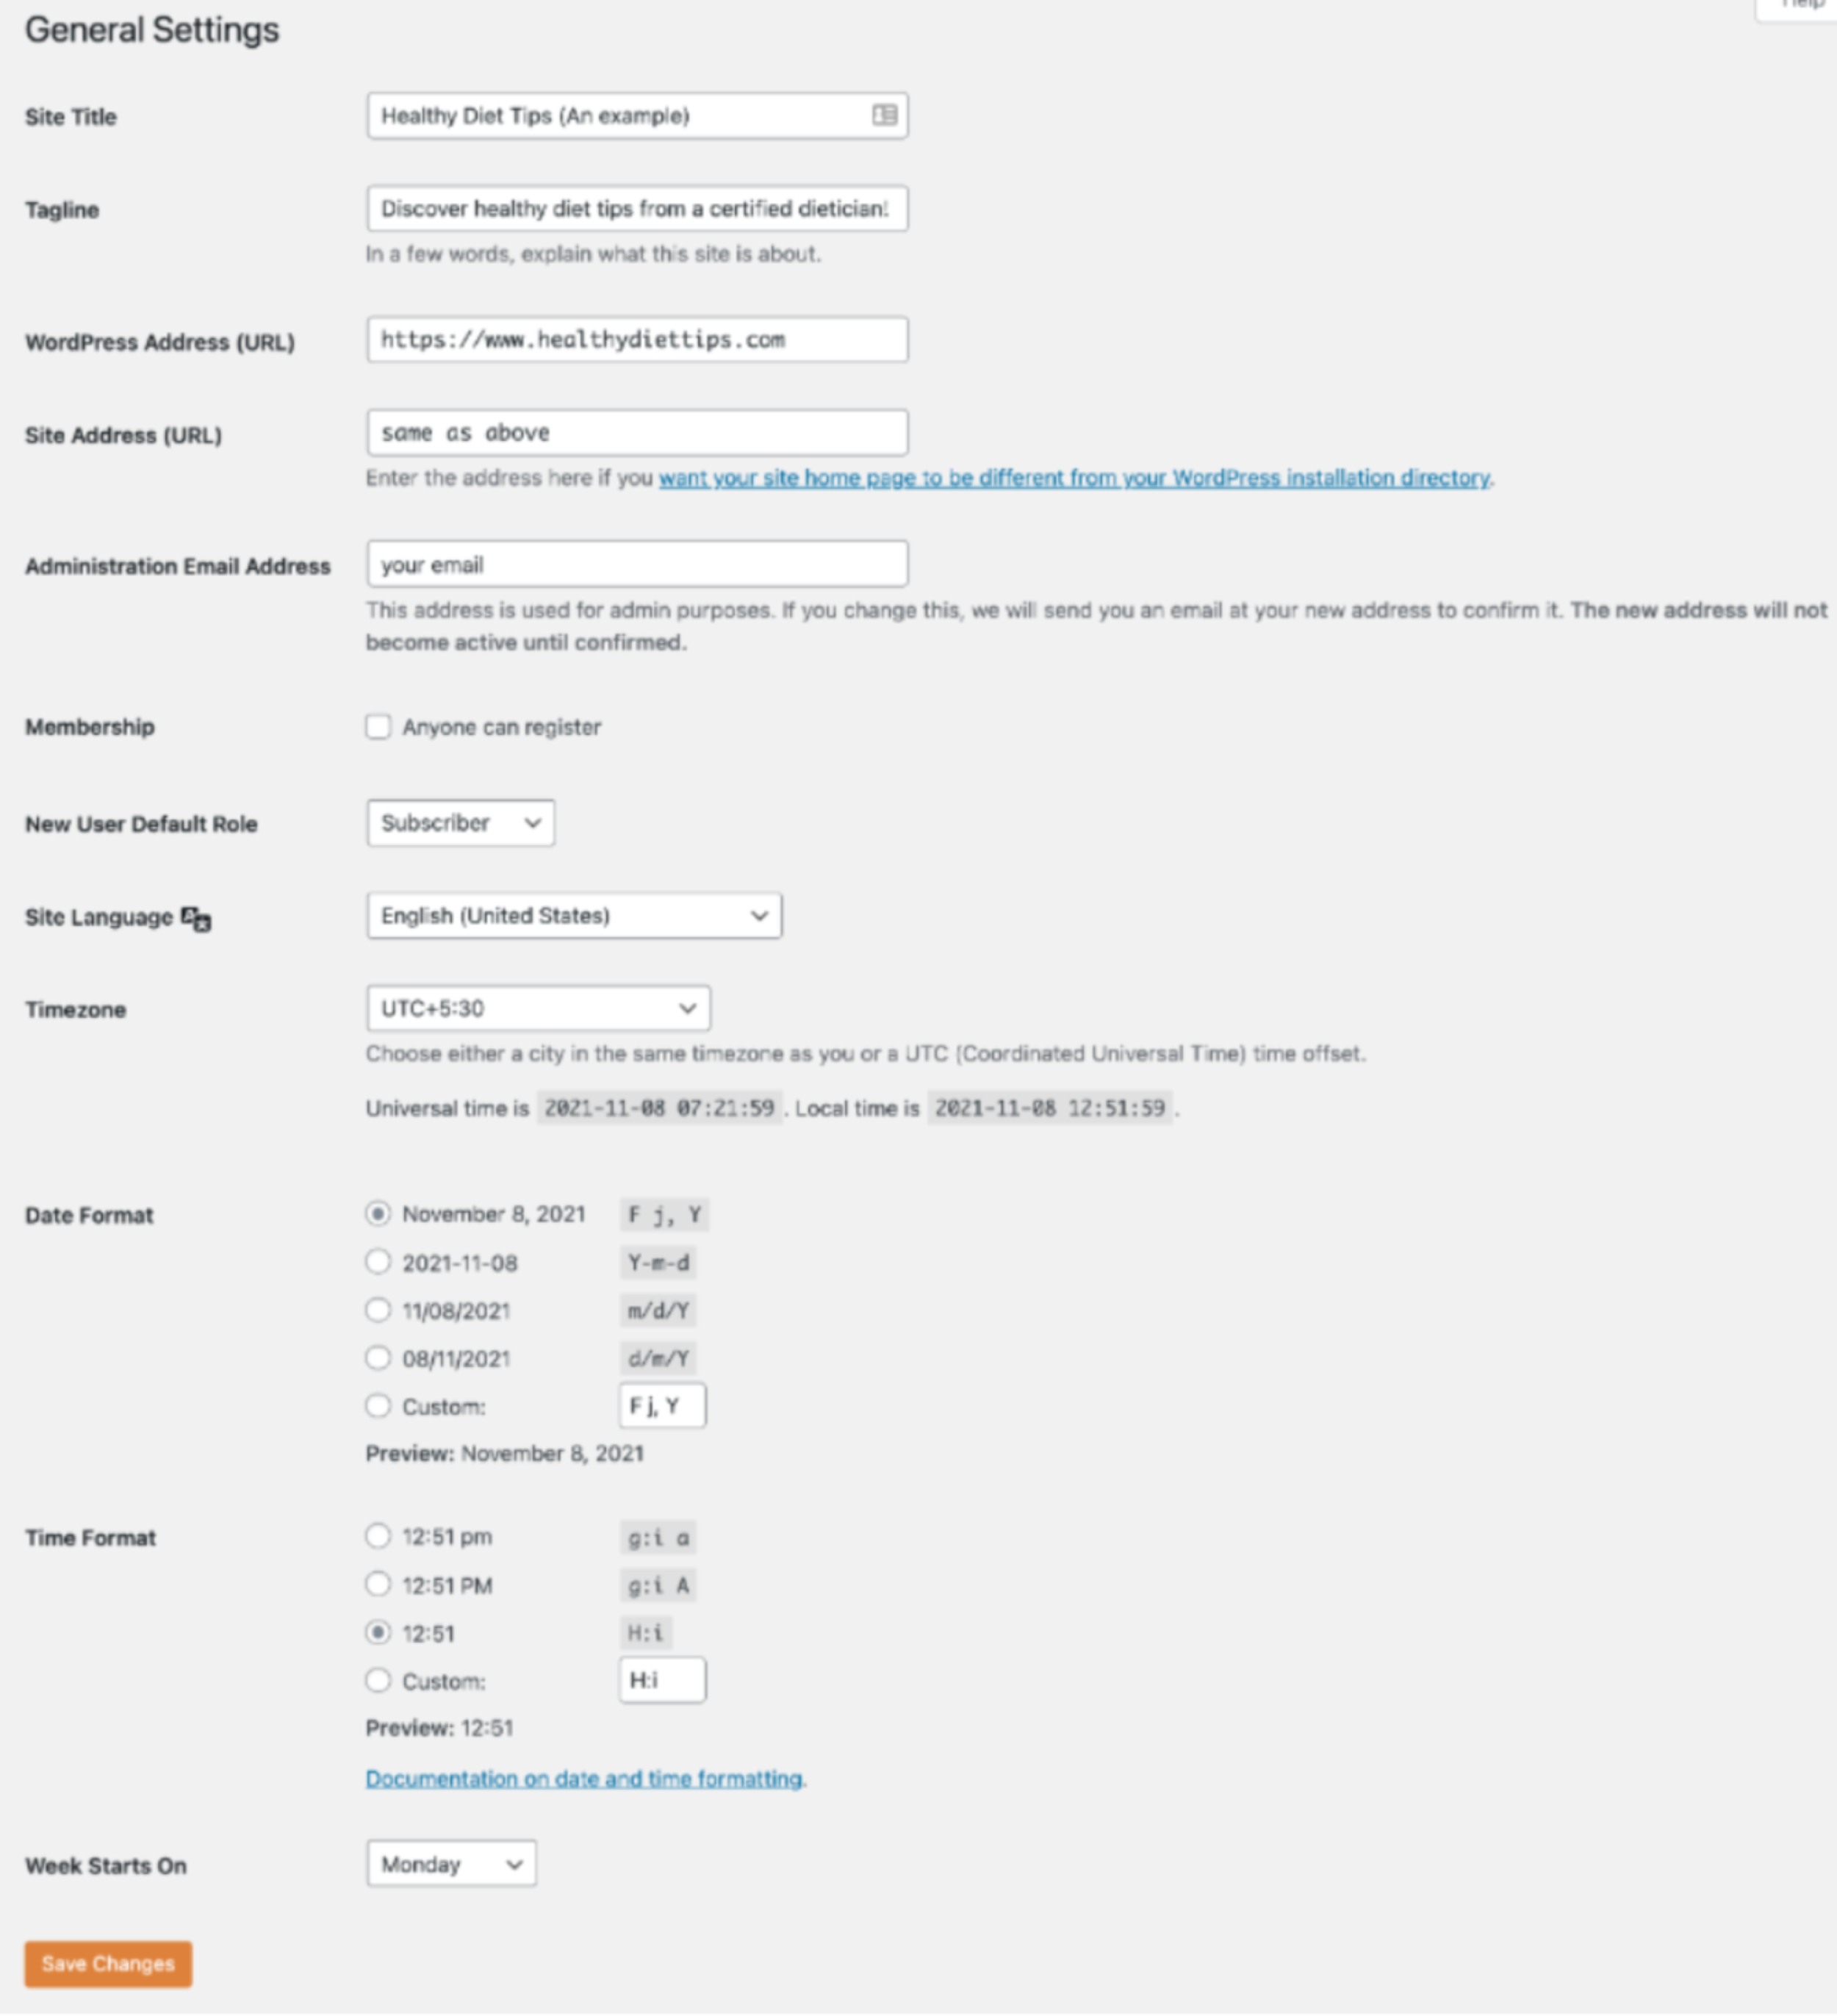
👉 On the dashboard, go to the "Settings" section and click on the "General" option.
Replace your site's title and title tagline.
While you're at it, think about changing your site's address, date, and time format. These appear as metadata in your posts and give users an idea of when a post, comment, or content is posted/upgraded on your blog.
Take a look at the screenshot below and modify everything according to the attributes of your website.
Manage WordPress Comments Settings
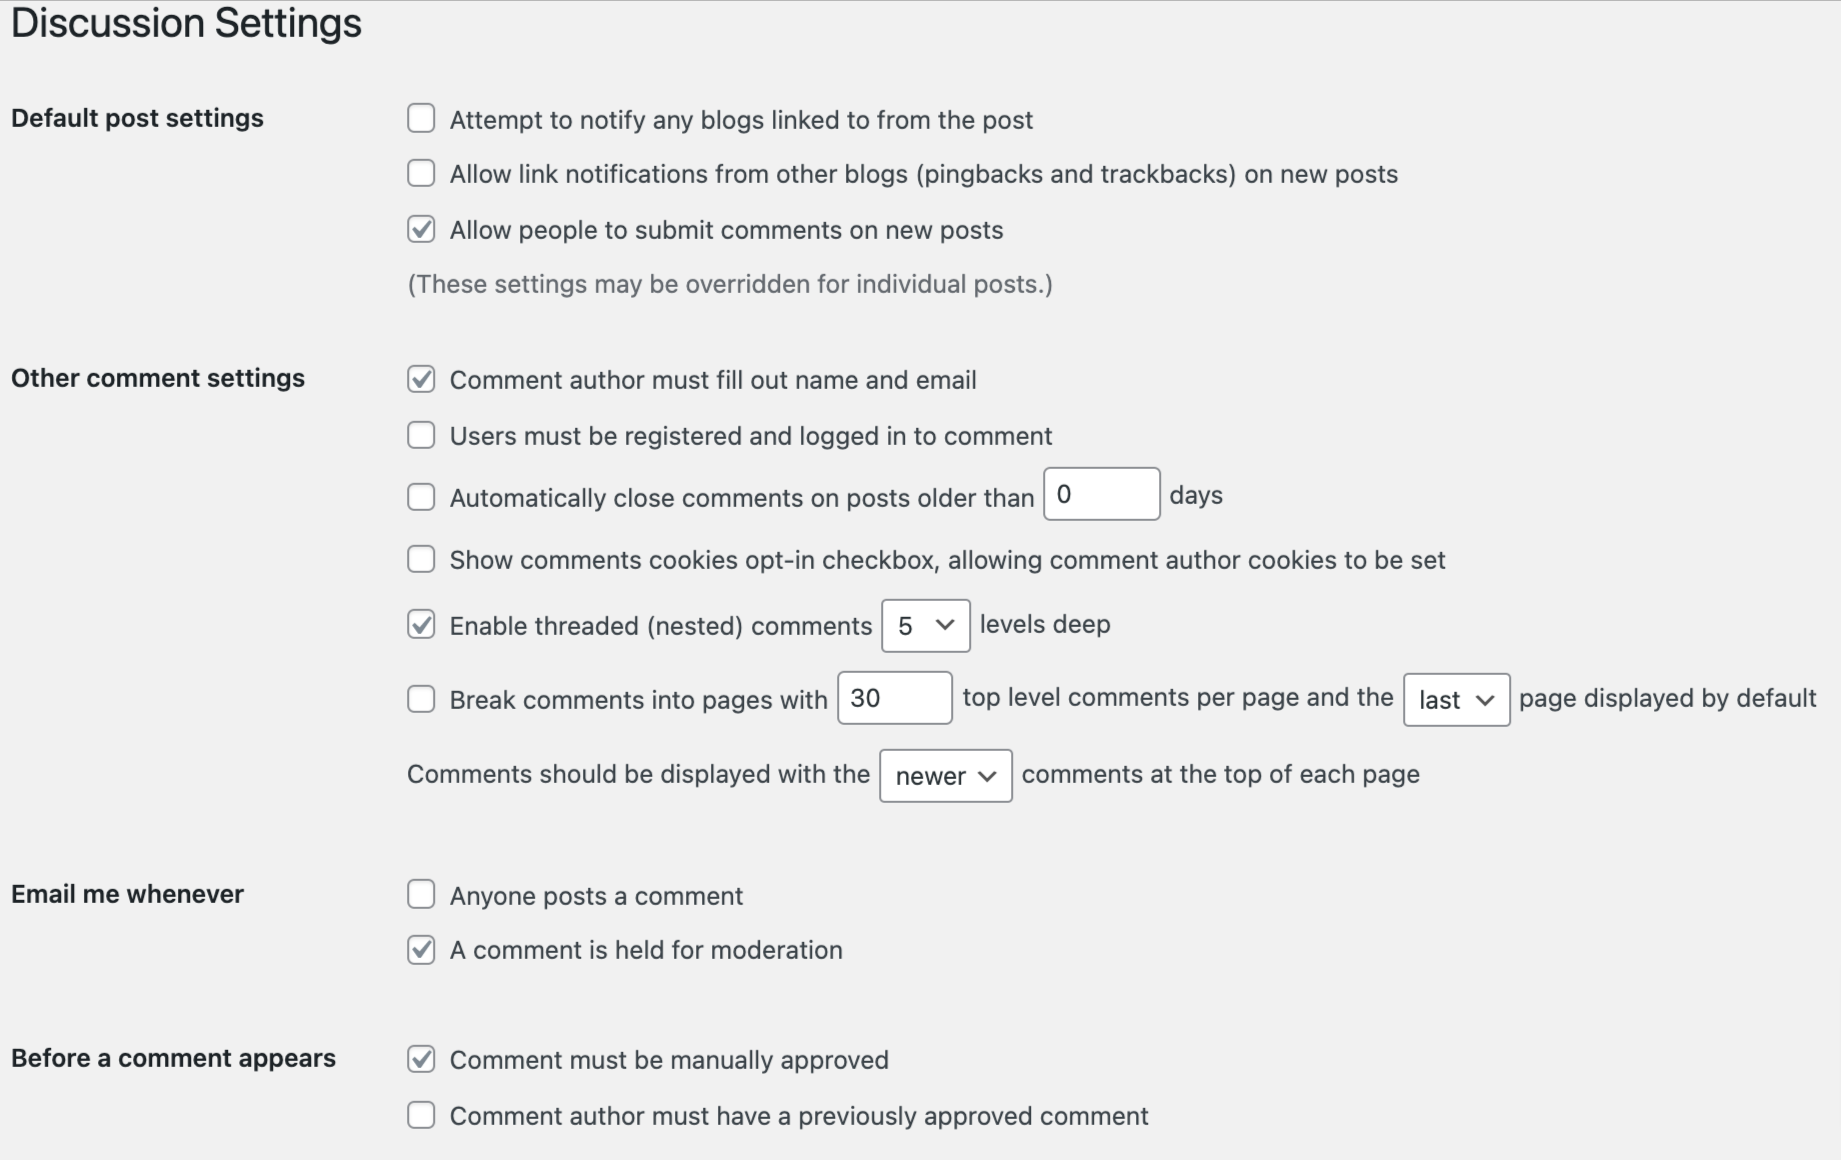
By default, WordPress websites allow everyone to leave comments on your post. However, you have the ability to customize and filter which comments go through your moderation. For instance, you can set a limit on the number of links in a comment. Ideally, there should not be any links inside the content of a comment, but spammers often spam their comments with links. You can set this limit directly to the spam folder. You can also set the number of comments to show on a page.
You can also specify the number of comments you want to show on the page. Below is a screenshot showing how to create comments after WordPress installation.
Once you’re done here, scroll down below to check out a few other settings you can manage. These will allow you to take comment moderation to the next level.
You can send comments directly to moderation, or to the trash box, based on the key words they include.
Set Up Your Permalink Structure
Your URLs are your site's permalinks. Some sites have data on their URLs, some have category slug before page slug, and most just have the post url after their domain name.
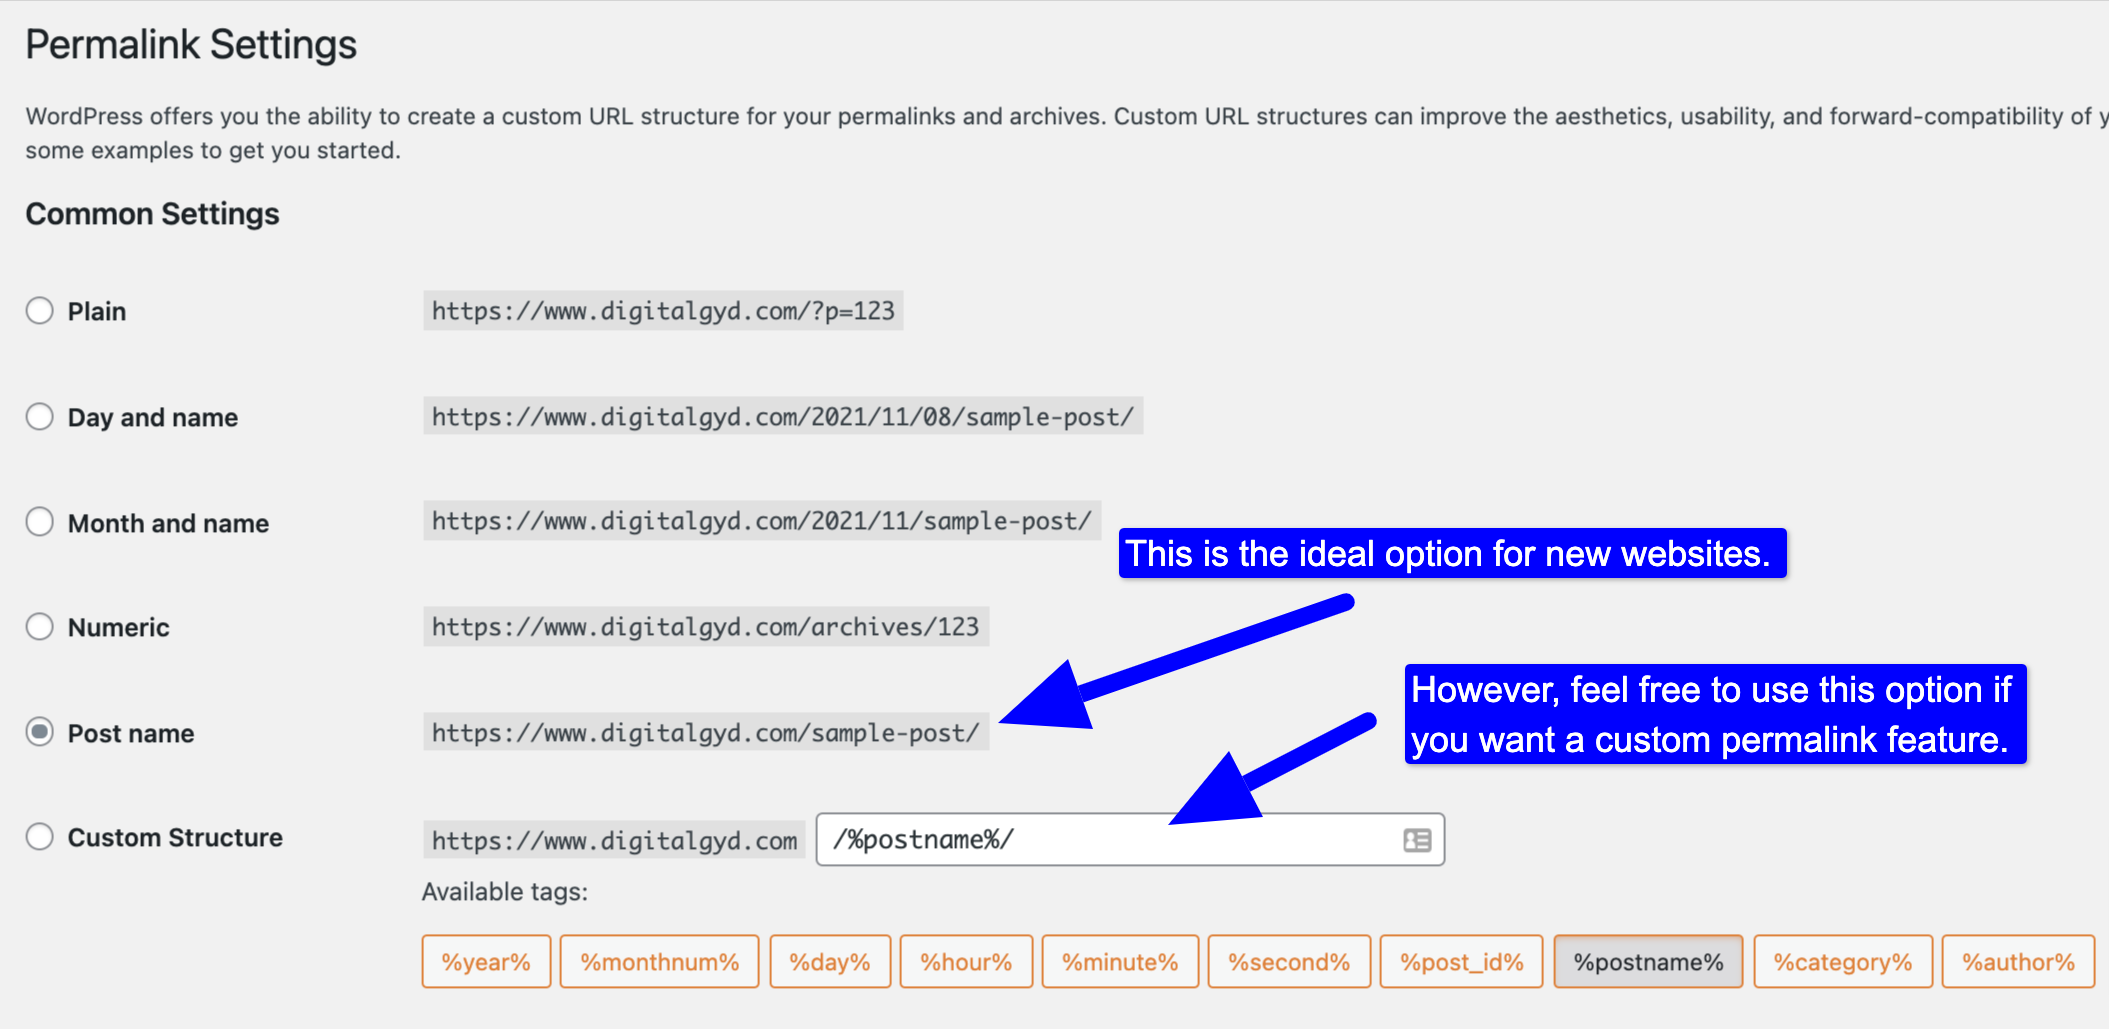
In general, if you're starting a new website, you don't need to worry about the permalinks structure.
But if you're moving from a site that has a custom permalinks structure, or if you want a specific permalinks structure instead of the default permalinks structure (which is the recommended permalinks structure), you can go to Settings > Permalinks option.
The default permalinks format is permalinks.com/ post-name.
✍️ Please note that you should only use the second option if you are moving from another URL structure.
Setup your profile
WordPress lets you create separate profiles for each writer, admin, contributor, etc. You can use this to show your information at the end of your blog posts.
To create your own profile, go to Users > Your profile from the menu.
You can set:
👉 On the frontend, WordPress shows your name (usually in post metadata or under articles in author bio), a brief bio, a link to your website and social profiles (after you install an SEO plugin, which we’ll talk about later in this article), and your profile picture (WordPress’ Gravatar.com).
Set up an SEO plugin
The latest SEO statistics show that 75% of website visitors never make it to the top of Google’s search engine results pages (SERPs).
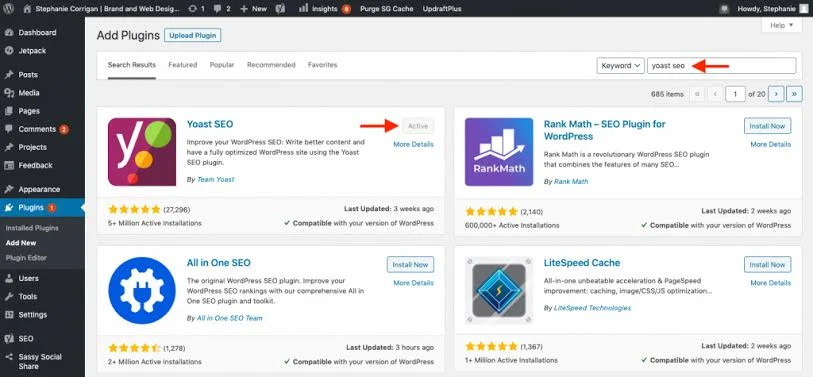
If you want your blog posts to rank in Google’s top 10, you’ll need to optimize them for search engines. That’s where a WordPress SEO plugin like
Yoast’s WordPress SEO comes in handy.
How to install WordPress SEO?
Go to your dashboard to “Dashboards” > Plugins > Add New” and search for “WordPress SEO”.
Once you’ve found the plugin, click on the install button and activate it.
👉 Please note that there are other SEO plugins such as Rankmath and All in one SEO which do the same. You can select whatever you want.
👉 Once you have activated the plugin, it will guide you through a simple setup process and you will be ready to go in a minute or less.
👉 Pro tip: After installing Yoast, you will be able to activate the social media handles option (or URL) for your user profile. (We discussed this earlier.)
Delete default WordPress content
By now you must have come across some of the standard WordPress content that you need to get rid of.
👉 To delete a default WordPress post, go to the Dashboard> Posts>All Posts.
👉 You will see a post named "Hello World" that has already been published. You can hover your mouse over the post to see the "trash" option and click on it.
👉 To delete a sample page, use the same steps to delete the "Sample page" under the "Pages" menu option.
👉 If you want to delete a single sample comment, go to "Comments" > "Trash the only comment."
👉 To delete Hello Dolly, go to "Plugins>Installed plugins>Delete." This is a "default" plugin that is not needed.
Install Recommended plugins:
As I mentioned before, WordPress has many plugins that can help you run, grow and manage your blog. Here are a few plugins you should install:
👉 Akismet AntiSpam: Manage/filter spam comments.
👉 Contact Us Plugin: Create a contact page.
👉 Table of Content Plus: Show a basic table of your articles’ content on the frontend.
👉 W3 Total Cache and W3 Super cache: Enable caching for faster site loading speed.
👉 Wordfence and iThemes Security: Secure your site against attacks and hacking attempts.
👉 Updraftplus backup plugin: backup your site in the worst-case scenario (very important)
Pro Tips : Don't be tempted by the plethora of plugins available in the WordPress repository. The less plugins you have installed, the better.
Add a Contact Us page
A Contact Us page is one of the most important pages you’ll ever publish. It’s where your readers, sponsors and potential collaborators can get in touch with you. You can create a page called “Contact Us.” (Navigate to Dashboard > Pages > Add New) and enter your contact information. You can also use a plugin such as WPForms lite (the free version is good enough for most, but they also have a premium version), to create a form for people to fill out. You can also enable spam protection using this plugin and add the shortcode to your contact us page.
Add important pages
In addition to your Contact Us page, there are several other pages you’ll need to set up before you publish your site to the public.
One of the most crucial things you’ll want to do after you’ve installed WordPress is publish your legal pages. These include privacy policy pages, a disclaimer page, etc.
👉 A privacy policy page lets your visitors know how you protect their privacy, what data you collect through your website, and how you use that data. WordPress now comes with a built-in privacy policy page, but you’ll need to tailor it to your needs.
👉 A disclaimer page lets your readers know that your website (and you as a business) is protected from legal liability. It lets your readers know what kind of advice, services, etc. you offer, and if you’ll be held accountable for anything that occurs after you follow your advice.
👉 The General Data Protection Regulation (GDPR) is one of the most significant data protection regulations in the world (especially if your target audience is in the European Union). The GDPR focuses on how EU citizens’ personal data is handled. While we’re not going to discuss GDPR compliance in this blog post, here’s a quick guide to understanding it.
Pro tip: These pages are extremely important, so it’s a good idea to get legal or certified help if you’re not sure how to present them.
Install and customize your site's theme
Now that we’ve covered the backend stuff, let’s move on to something a little more interesting: beautifying your site and optimizing it for a better user experience and conversion rate.
The standard WordPress theme is pretty basic, but you don’t have to settle for anything less than the best WordPress theme out there. There are thousands of free WordPress themes available on the WordPress theme repository, so you can easily find the one that’s right for you.
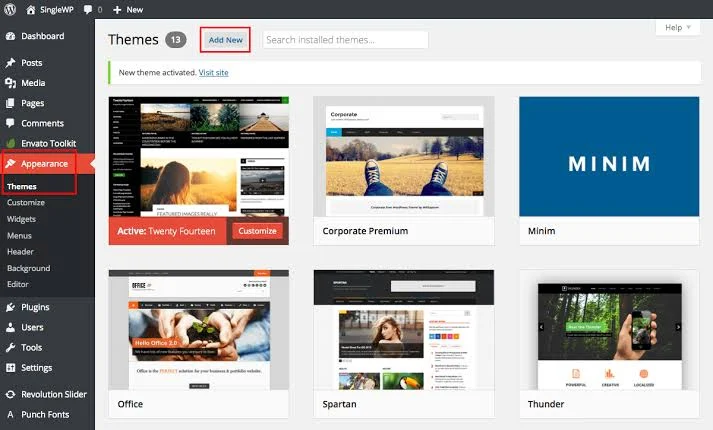
Once you’ve found the perfect theme for your site, head over to Dashboard > Looks > Themes.
Here you can view your current WordPress theme. To add new themes to your theme collection, click on Add New.
If you’re looking for a single page portfolio theme, food blog theme, or agency website theme, WordPress has you covered.
Here are some of my personal favorite free themes:
➦ GeneratePress
➦ Astra
➦ Neve
Pro Tips: Most of the themes are easy to use from the get-go, but if you’re looking to customize it or want more advanced features, premium themes are always available.
I love using Divi to create quick landing pages, and I love the flexibility of designing my own website with drag-and-drop builder, and I’ve also used GeneratePress for simple and minimal sites.
Once you’ve chosen your theme, it’s time to customize it. Depending on the theme you’re using, customization is relatively easy and usually comes with support and help from the theme developer.
Add a favicon
Adding a site favicon is one of the most important things that most beginner site owners don’t think about. A favicon is a tiny icon that appears on the right-hand side of your browser tab (at the beginning of your website’s name). It helps your readers to identify your website amongst other things.
In fact, Google has started displaying favicons in the search results pages (SERPs).
Having a site favicon (and a well-designed one) can increase your brand awareness and CTR in the search engine results pages.
So now that you know what a favicon is and how to add one to your site. Let’s take a look at how to add a favicon to your site.
👉 Go to Appearance > Customize > Site Identity
👉 Scroll down to the area labeled “Site Icon”
👉 Copy and paste your favorite favicon image there
Points to remember:
👉 Favicons are square files and their size is a multiples of 48 pixels.
👉 The optimal size of a favicon is 512 pixels * 512 pixels. Don’t update your favicon often (it helps increase brand recall value).
Conclusion
Now that we’ve covered almost everything you need to know after installing WordPress, let’s move on to the next step: publishing content that solves your readers’ problems and sets you apart from the competition. Check out our guide on building a successful WordPress blog for beginners to learn how to do just that.
Finally, don’t forget that blogging isn’t a goal, it’s a journey. Your content publishing and optimization tasks are never finished, and that’s what makes blogging worth it!
So, go ahead and start customizing and designing your WordPress blog!


